Thursday 23 January 2014

Viski's Tuxedo Progress

Viski's Tuxedo


So for my first commission I was understandably ( I think) nervous about the fact that I would be working off measurements and not able to fit and refit the outfit to get it perfect. 
I took about half a million different measurements! Still managed to miss some key ones, but luckily the massive amount of different measurements allowed me to work out the missing ones.
 
I drew up some designs and these are the results.
The ones on the right hand side are working out the measurements, of the ones on the left I have decided to make the bottom right and the middle design.
I will be making 4 jackets, 3 out of cotton and one final design in satin.
The first one will just be a standard jacket so that Viski can try it on for size and get used to wearing a jacket.
The second and third will be cotton versions of the coat tails and jacket style tuxedo.
Once these are done, Viski's mum will pick her very favourite and I'll make it in beautiful satin so Viski will look like a total star on his mum's wedding day.


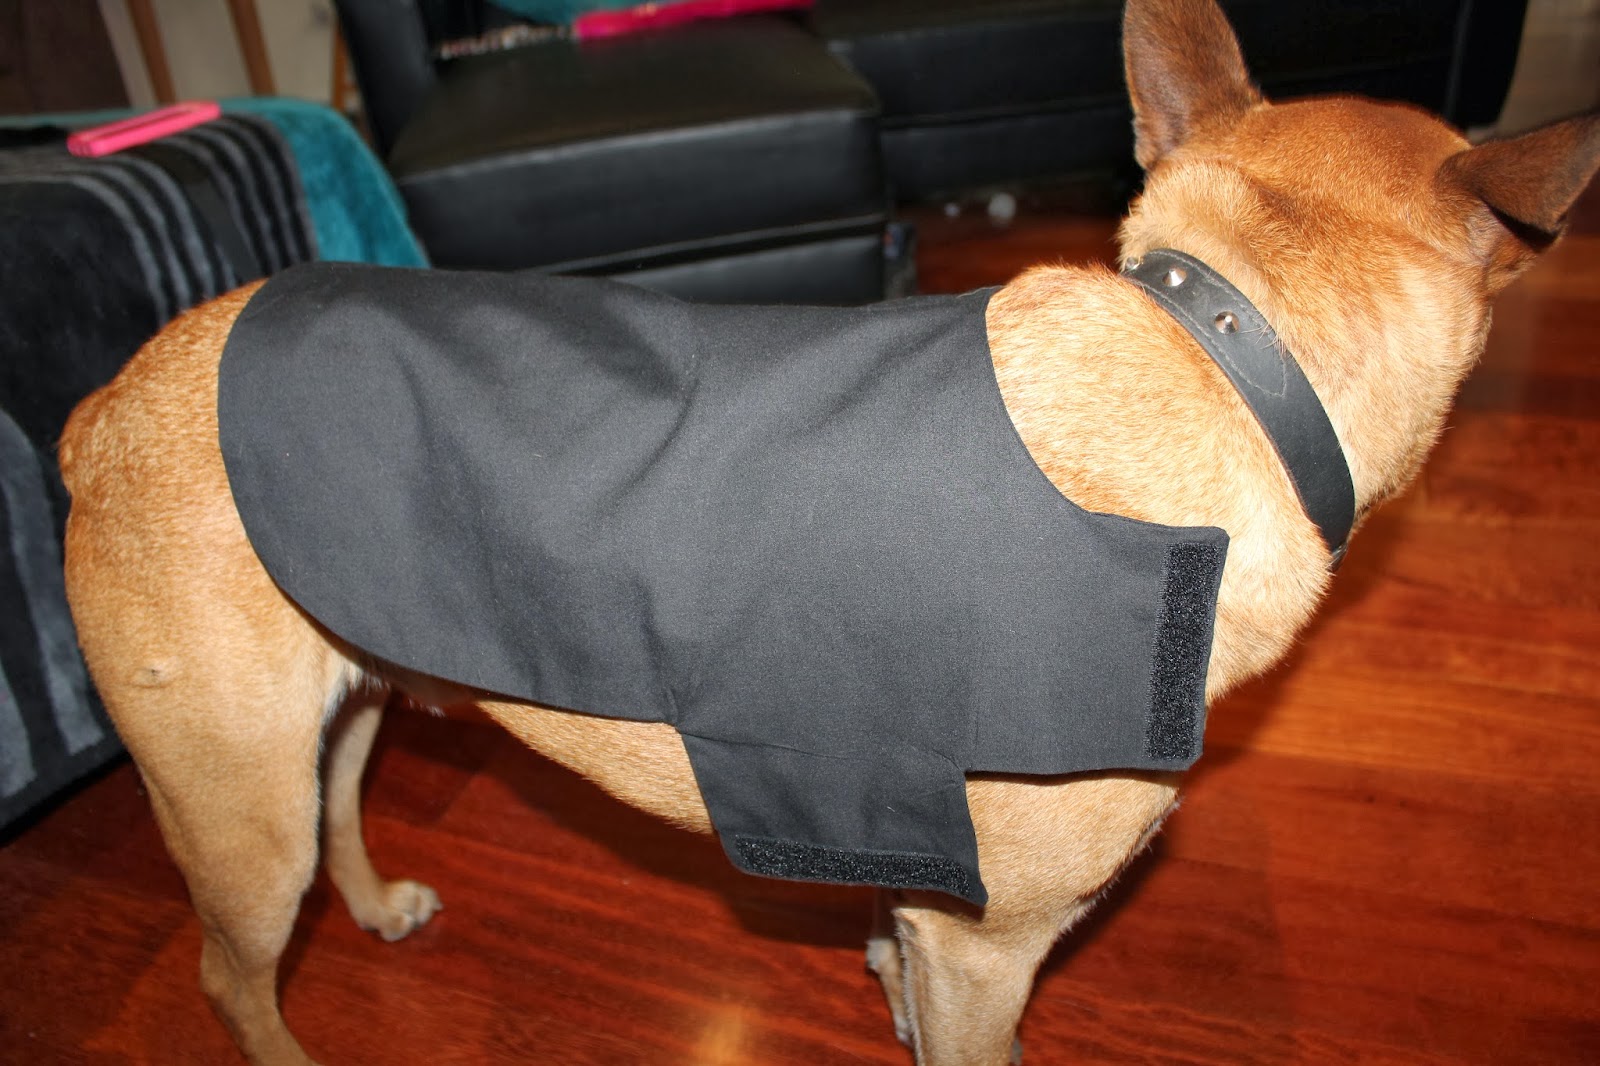
This is the basic cut out pattern of the measurements.  From this I cut a replica and shaped it to a more rounded, sleeker style.
This comparison shows the difference between the measurements and the final shape.
A big difference between this design and my regular outfits, apart from the huge size difference (Viski is a Fox Terrior x) is the uneven chest straps.  I have made the left side longer to accommodate chest detailing for the front of the tuxedo.
Once I had the basic shape I cut it out in the black cotton and sewed it together, leaving the end of the longer chest strap open to turn the jacket right side out.

The last thing to do was add some Velcro to the chest and tummy straps!
I managed to track down some awesome black Velcro which is almost invisible against the black cotton.
 
Beau and Honey gave the outfit a test run to show how TINY it is!!!
 
Once Viski has tried it on I'll either be modifying the pattern to fit properly and making another version of this in the correct size or I'll be making the cotton versions of the fancy designs.
 
:)


Monday 6 January 2014

Distractions

Distractions!

A quick overview of some of the projects that have been distracting me from completing Honey O'Hara.


Stocks

I will write a full post on the progress of the stocks but this is the pattern I made.  It is a type of tie worn by dressage riders.  I wanted to make my own predominantly because I wanted more interesting colour combinations and also to get more practice creating patterns and sewing accurately.
During the patterning process I accidentally designed it with the neck piece upside down.  I need to unpick the neck bit and reattach it via the top seam.
Above is a picture of the pink stock I created alongside the one I used as reference - an old one that I've been using forever which is getting a bit ratty.
I edited it quite the design quite a bit in terms of dimensions although it is not obvious in this photo.
 

Mayan Goddess

 Got invited to a Mexican themed party and I didn't want to go as the generic senorita, matador or sombrero wearing ombre that are the first things that come to mind when you think Mexican costumes.  I decided to go a little further back through Mexico's history and draw inspiration from the ancient Mayan and Aztec civilizations. 
This is my original design sketch.  The top stayed fairly true to design but I decided to go with a longer flowy design for the skirt instead of the short wrap. 


Just some quick snaps on my iphone.  Will need to get some good quality photos at some point.  I did have an awesome necklace on the night to go with the costume that I borrowed but the drunkenly taken photos from the night didn't turn out.

Buddha Paintings

For my mum's birthday this year I painted her a large Buddha painting and four smaller paintings with stylized symbols of Buddhism.
 
I added inspirational quotes from special sources including one from my mum herself which I put on the Buddha painting.
 
Clock wise from top left -
 
"You have brains in your head. You have feet in your shoes. You can steer yourself any direction you choose.  You're on your own.  And you know what you know.  And YOU are the one who'll decide where to go!" Doctor Seuss.
 
"All our dreams can come true if we only have the power to pursue them." Walt Disney
 
"Dare to live the life you dreamed for yourself.  Go forth and make your dreams come true." Ralph Waldo Emmerson
 
"All that we are is the result of what we have thought.  The mind is everything.  What we think we become." Buddha
 
"You can achieve anything you set your mind to." Mum


Hobby Horses

 Made three hobby horses.  One for practice, one for me to match my costume and for practice in the official material and one to match my best friend, Eileen's costume.
 
Here are the ponies waiting for their ears and sticks.
The theme was never growing up and you had to come as a cartoon character from your childhood. Eileen's costume was based on Lady Lady Lovelylocks so I made Lady Lovelylock's horse, Silkymane.(right)

 
I went with a costume based on Rainbow Brite so I made Starlite for my horse.
Posing with the finished ponies before presenting Silkymane to the birthday girl!
She LOVED them!!


Name Painting

Just a little painting I did for my husbands little cousin, Hannah.
 

**Future Projects**


Viski's Tuxedo

 Will be completing a little dog tuxedo for my friend's Jack Russell Viski. 

Elsa Costume

 Supanova is Australia's version of Comicon and 2014 will be my first year.  For my debut I want to dress up as Elsa from Frozen!  Look forward to details on this in future posts.

Complete Honey O'Hara

 Once I've got the first to major projects for the year, Elsa and Viski's Tuxedo, I'll be working to finish Honey O'Hara.

Complete Stocks

 Once I've fixed up the pink stock I'll be finishing off a whole batch of fresh colours!
 

Complete a new version of Beast's (Prince Adam from Beauty and the Beast) navy jacket. 


Monday 2 September 2013

Honey O'Hara Part 3

Honey O'Hara

Lace, Lace and More Lace

The next step is adding the lace to the strips to soften the edges and give it a more feminine look, and of course to match the original inspiration of Scarlett O'Hara's HUGE ruffled dress.
Adding the lace was much quicker and easier than hemming endless metres of strips.  It was also a lot more satisfying because the finished effect is so pretty!
Just a quick snapshot of a strip with the lace pinned in place.  I also folded the lace over at the end and sewed a mini hem to make sure it wouldn't fray.

Just a close up of the layered effect of the lace with the strips above.
Below is a shot showing three of the strips just draped in place while a fourth strip waits to have its lace sewn on.
Finally all strips are sewn into place and finished off with lace in the below photo.
The skirt is actually very heavy! A lot heavier than I expected and I may need to put even more tulle in place to hold it out than I had originally planned.
It does look awesome though and I think it is going to be as true to the inspiration as a dog costume can get.
After having a feel of the weight of this skirt, I am definitely glad I reinforced the Velcro.
A pic to show the details of the lace, it really is very pretty.
I was amazed at the range of lace that was available, made it difficult to pick just one!

The last thing I did before declaring the skirt 'finished' was add an extra bit of lace to the top of the layers because it looked bare without the lace.
There is still gathering before the skirt is officially finished but there are no more bits and pieces to add so I can start working on the tulle.
 

Wednesday 14 August 2013

Honey O'Hara Part 2

Honey O'Hara

The Skirt

 
 Apologies for the delay between posts.  I will put up another post about what crafty activities have been keeping me at bay.
Despite my absence from the blog, there has been progress with the costume.  The skirt is nearly there.
The first thing I did was cut out that main section of skirt - basically a HUGE rectangle!
The Honey O'Hara skirt uses a lot more material on the skirt than the Cinderella, even just for the base layer.
This is because the skirt is going to be a lot fuller so I had to allow more length. 
I hemmed the edges so it wouldn't fray and then moved onto the strips.
To create the layered frill effect of the dress I am making strips of fabric and attaching them to the base skirt.
Each strip needed to be pinned and hemmed individually.
This part of the costume took FOREVER!
 This is one of the strips all pinned, ready for hemming.
 I started with three strips so I could test out how much overlap I wanted with the layers and work out from there how many strips would be needed.
 Here are the strips shown all hemmed up and laid out alongside the base of the skirt. 
 Below is a photo of the three strips layered on the base.
I left a gap before starting the layering so I can fold the top of the skirt over when its connected to the rest of the costume.  This will hide any unwanted seams.
At this stage the untidy threads are all over the place but they will be tidied up before the strips are sewn on.
There's not much left over from all that material I started out with. 
I used the existing strips as a stencil to cut around to speed up the process.
Luckily there was just enough fabric left for the remaining strips.
The next blog post will cover the remaining steps for the skirt, adding the lace and attaching them to the base.
 

Friday 19 July 2013

Honey O'Hara - Getting started

Honey O'Hara

Part 2 - Getting Started

The first step in this mammoth project was to sew the basic jacket which forms the base for most of my costume designs.
 
As I said in the last blog, there is a LOT of fabric involved in this one!
 
 To cut the shape out I first fold the material so its doubled over.
I don't fold it completely in half because I don't want to split the left over fabric. 
Just folding the amount you need leaves the leftovers all at one end which is handy if you have to cut another big piece out.
 I always pin the paper to the fabric so it can't wriggle around and muck up the shape of whatever it is I'm cutting out.
You don't need many, I just pin at all the corners.
Next step is to ditch the paper patter and pin the two bits of fabric together ready for sewing. 
I use a lot more pins in this step!
I do minimal pins toward the tail because the corners are going to be cut off to create the nice rounded shape.
Corners are now all cut off to make the desired shape.
Before sewing I add more pins to the tail end so it stays in place as well.
 Have sewn it all together and turned it right way out.
Also sewn closed the tail opening, added the Velcro and given it a quick iron.
 For this project I reinforced the Velcro because the dress will be much heavier than a normal outfit.
I haven't had any trouble with the Velcro pulling away yet, but better safe than sorry.
To reinforce it I stitched a zigzag across the middle of the Velcro in addition to the normal stitches I put round the outside to attach it.

The good news is that it fits perfectly and can now be put to one side while I create the skirt.
It all looks very plain now, but when it's completed it will look every bit as big and flouncy as they original!
 

Wednesday 3 July 2013

Honey O'hara!

Honey is  . . .

Scarlett O'Hara!

This time I am taking my inspiration from an American and cinema icon - Scarlett O'Hara.
 
For those that haven't seen the 1939 epic, Gone With the Wind, the dresses are BIG!
Very VERY big!!
  
This particular dress is the inspiration for Honey's next outfit.
Lots of ruffles!
Lots of Lace!
And
Lots and LOTS of material!!!
Here are some more shots of the inspiration dress
You could almost host a tea party under a civil war era dress!!
 
My other favourite outfit from the movie.
 
 
 This may be a future outfit for Honey but for now sticking with the ruffle dress.
 
 
This dress will be even bigger than the Cinderella dress and will feature lots of layers on the skirt.
I'm also going to try to fashion feaux sleeves, also with lots of layers.
Lace will adorn EVERYTHING and there will be a red velvet sash for a belt.
 
Keep an eye out for the next post showing Honey's outfit taking shape.